| Drawing,tools, shop building |
Marty Rabeno,
Thank you for your responce in regards to the bulino art. It will be quite awhile before I ever am engraving bulino scenes like that. I still dont understand the different degrees of the faces on those tools. How do you achieve those different faces on your bulino tools? Hand held? Do you use the GRS tool holding devises?
Anyway, your scenes are fantastic, and I will be trying to get my drawing skills in order to do work like you someday.
Do you have a large shop? Are you using hammer and chisel or power assisted. I like both.
Thank you for you great work, it is eye candy and makes me want to draw and engrave when I see it. Mark Smiths new photos of the Ruger are Tremendous also!!
Thanks again
William
William Dietz
10/20/2006 6:10:30 PM

![]()
![]()
![]()
|
Hi Willaim
I'll try to answer your question about my tools. I sent Bill a scan of my two bulino tools and hope that he will post them for me. Elk season starts here tommorrow and I'm running around like a chicken without a head trying to get every thing together. Hopefully I can type this with some sort of intelligence while my mind is someplace else.
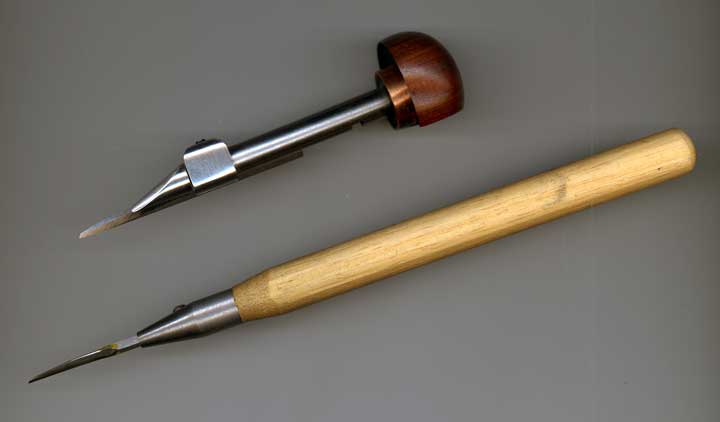
The first tool I use is my line tool which is usually a 70 degree V tool. By that I mean 70 in cross section like a 90 or a 120. The face angle I sharpen to usually a 50 degree angle with a 15 degree heel. The heel is small and runs up the total length of each side. The handle is made by Ray LeTourneau. I like these as I can get a good grip on them with my fingers. The other long handled tool is the one I use for poking or making dots. It too is usually a 70 degree tool and this time I have anywhere from a 40-50 degree face with no heel..I want this to go straight into the metal. I hold it sort of like a pencil and rest it on my left thumb to help me guide it along as i poke.
For sharpening I really like the GRS Dual Angle fixture. It's easy to use and consistant. I usually sharpen the face 1st to a 50. To make the 70 graver I grind each side with a 55 degree rotation setting . This will leave me with a 70 degree tool. To grind my heel I set the rotation angle to 35 and just brush it over my 1200 wheel lightly. Hope that helps you out and hope I made sense in my pre hunting season haste. I'll try and check back quickly tomm night.
Martin Rabeno
10/20/2006 9:25:38 PM
![]()
![]()
![]()
|
Good luck hunting Marty!
Here is the photo you sent showing your tools mentioned above.
Bill Gamradt
10/21/2006 1:44:40 AM
![]()
![]()
![]()
|
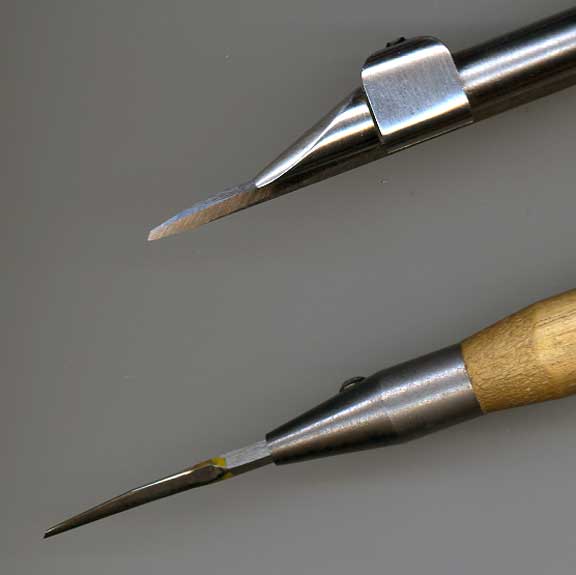
A more detailed view of the tools.
Bill Gamradt
10/21/2006 1:46:08 AM
![]()
![]()
![]()
|
Marty,
Thanks so much. It's 5:30 am and I will post a responce later today when I get back on. I have been up all night practicing, and I am beat now.
Write mopre later.
Willaim
William Dietz
10/22/2006 5:09:43 AM
![]()
![]()
![]()
|
Hi Marty
Hope the Elk hunting's going well.
The long white handle....Is it one you've made yourself?
When your putting the dots in...do you try to keep the work facing the same direction all the time so that the dots are also consistant....Or dosn't it really matter.
Cheers
Andrew
Andrew Biggs
10/24/2006 5:55:42 PM
![]()
![]()
![]()
|
Hi Andrew
So far the elk are winning..You go up the mountain and down the mountain.Up the mountain and down the mountain.At least the mountains are beautiful.
The straight handle is something I bought a number of years ago but it is super easy to make. It's nothing but a hardwood dowel with a hollowed out tip you can make. It has a allen set screw to hold the graver in place. I do my poking from all different directions and combinations to give me different effects. When combined with lines the textures can be quite varied for the good of the image. This is not stippeling as OI am not going straight down into the metal as I would for backgrounds between the scroll leaves. When I poke, I am also doing this in a definate pattern according to the contours of the image.
If you have some of the NgravR Belgium Chasing Handles you can use those also for poking. You might evenlike the square shape as opposed to round. You can also make these out of square stock. Hope this doesn't confuse you.
Martin Rabeno
10/24/2006 6:07:00 PM
![]()
![]()
![]()
|
Some other things I do while I engrave these..dab the surface with modeling clay....this cuts the glare so you can see what you're doing....also I will rub a Sharpie type felt pen ink into the lines and wipe it off quickly to backen the lines in so I can see what I'm doing. it all comes right off with a little WD40.
Martin Rabeno
10/24/2006 6:10:43 PM
![]()
![]()
![]()
|
Marty,
I too was curious to see your bulino tools. Thank you for posting them, I appreciate it.
A few years ago I believe I used the same technique you use but found it difficult to execute the type of detail I was attempting to achieve. Consulting with a colleague he informed me that to achieve a higher level detail with that technique would be difficult at best. He then instructed me on the history of stiple dot engraving, he told me of its history and that it began between the years of 1400-1450 in Italy. The method was first developed in printing high definition images in books, which we consider bulino today. (I've seen the extremely detailed images in some of those books and wondered how they achieved such a high level of detail.) He then instructed me on the stiple dot technique. He instructed me that it is possible to get between 200 and 1100 dpi's (dots per inch). With this technique on its own or combined with line bulino it is very reasonable to execute extememly detailed images, almost photographic in their imagery. But don't take my word for it, see for yourself; his website is http://it.geocities.com/albino_contessa . What makes his website so unique to me is that you can view the image and double click it again and it really balloons it up so you can really see the details (even the dots) He and his daughter execute some of the best detailed engraving I have seen. It is my attempt to emulate his ability. Also, Steve Lindsey talks in some detail about this process on his website and this is the technique I believe he uses on all his projects; and we certainly all know the level of detail he is able to achieve.
Thank you again,
M A Smith
Mark Smith
10/24/2006 9:06:15 PM
![]()
![]()
![]()
|
Mark
What can I say....this is what works for me and I can get the affects I want with these tools. I do know that I would have a very hard time trying to render anything with your assortment of tools, but that is what you seem to like so go for it. Many dots or lines no matter how they are created will not make for a good design or finished product if they are not used and placed properly. That is the hard part. Like I have always told my students."I can teach you how to engrave a line. Now what are you going to do with that line?" Think like an artist.
Martin Rabeno
10/24/2006 11:56:10 PM
![]()
![]()
![]()
|
Marty,
I so do enjoy your perspective. You are an interesting individual. But I so do enjoy individual interpretational persepective because there is nothing more complicated in this life then perspective. I would find it impossible to achieve the level of detail that I strive for with your tools, but I so do enjoy observing your wonderful and precise execution. I've always enjoyed seeing your work and look forward to seeing more in the future. But I choose not to dismiss other techniques or styles nor critisize or condemm--my goal is to remain open minded and accept, and experiment. My tools and my styles are an extension of who I am artistically. Each day I choose to become better than I was the day before. I work harder, and I strive for greater detail. I do so enjoy our chats.
Mark
Mark Smith
10/25/2006 12:50:54 AM
![]()
![]()
![]()
|
We have segued into an interesting discussion or maybe I'm just hijacking the thread. I have seen fabulous work done using in general terms both techniques herein discussed Italian dot and line or a combination. The discussion is obviously not which is right but rather why does one uses the technique he uses and for what effect. I find the dot technique fascinating and able to create photo realistic results. However, most of my clients desire the line cut and deeper cut engraving because they want to see it when they hold it up and show it off to their friends without the aid of magnification. For me it is also faster to execute and I haven't been able to talk them into extra money for the dots. I tip my hat to anyone with the patience, skill, and resources for the dots. It seems to me that to choose a technique is a compromise between maximum detail and maximum viewability (good Idaho term) under diverse lighting. I saw a Facassi at a show and it was exquisite as viewed under the display lights but when one moved a few degrees it became washed out and lost. I suppose it's a bit of a question of personal taste or usually what the customer wants. On the other hand the former farm boy from Idaho might just be all wet.............again.
Lee Griffiths
10/25/2006 12:05:28 PM
![]()
![]()
![]()
|
Marty,
I woke up this morning realizing I had been handling this situtaion all wrong. It has been my hope to inform other engravers about the incredible possibilities of stiple dot engraving. But,in your posting you're so quick to dismiss this as nothing more than an applied background. I feel that this will discourage other engravers to even try this technique. Especially those experimenting with the bulino technique. It is my independent opinion that this is one of the most unique and diverse techniques there is, and I will give you two good reasons. The first reason...its so easy to execute. You can take any number of tools and sharpen them with or with out facets, sharpened to a point and off you go. Simply expermenting with the process as you go you can realize the possibilities. Second reason....the level of detail you can achieve is endless. The purpose for my tools is exploration of execution. Each time I use my tools I discover how much more detail I can apply to something. Expirements with shadows, shading; you can even add with this technique sunbeams coming thru the clouds or rain. There are so many possibilities with this technique. But I'm not the only one using this technique. Steve Lindsey for example; again he speaks in depth of this on his website and uses it in his work. My friend Contessa Albino (http://it.geocities.com/albino_contessa). If you have any doubt of the possibilites that can be achieved with this techniqe; strap a chin guard on and get to this mans website, double click on every photo to enlarge it so that you can really study the detail--this is the part where you will need the chin guard because your jaw will drop. You may even need a sponge to soak up the drool. I know of several other engravers that use this technique and have websites if anyone is interested. Isn't this the purpose of this forum to encourage and educate others and ourselves? And to inspire--the joy I feel each time I step into my shop that I am going to learn something new this day, whether it be from the forum, a new book, a new magazine or perhaps even flipping thru the pages of an old one. Anyway, I hope my descriptions aren't confusing to anyone. If anyone has any questions I will be glad to answer them. I'm happy to be part of the engraving community from which we seem to be shrinking in numbers.
M A Smith
Mark Smith
10/25/2006 12:05:35 PM
![]()
![]()
![]()
|
To Lee and Marty,
Lee you posted your posting so quickly I didn't even see it until today. But upon reading it, I took a minute to think about your words, I have never been a very good business man--often times when a customer picks up a piece he gets a bit more than he has paid for and is pleasantly surprised. Each time I sit with a customer and discuss what he wants and the executution begins something with in me pushes and pushes me to do more, more detail. I guess I never realized how pasionate I am about our trade. I've never been in this for the money.
Marty,
To you I appologize. I appologize for my fierce defense of this technique. I feel very strongly about engraving, the process for which we execute our artistry upon steel. I can see now the benefit of your process and realize its practical application. Please accept my apology. Since we live so close to one another, perhaps I'll enroll in one of your classes.
Lee, You are correct in that it is difficult to see this under certain conditions, thats why I mostly engrave under natural light, sitting in front of my window and then go to flourescent and I also have halogen. When I engrave I view them under all these different conditions and then make adjustments accordingly. I guess to me engraving is a bit more than sitting down and removing metal in a procress to form images and scrolls; I guess to me its an outlet, to express something a little more.
Thank you for your comments.
M A Smith
Mark Smith
10/26/2006 11:47:24 AM
![]()
![]()
![]()
|
Hi Mark
We're cool. Thanks
Marty
Martin Rabeno
10/28/2006 9:49:50 AM
![]()
![]()
![]()
|
| Respond |
, Custom Firearm Engravers")
, Custom Firearm Engravers")