| Some new photos |
It's been great seeing everyone elses pictures here on the forum. Here are two pictures of a rifle I finally finished for the ACGG. It's their 25th Anniversary 2008 Raffle Gun Project. The action is a Martini and Hagn single shot. I haven't seen the completed rifle as of yet and i hear it is being photographed at this time. Hope the pictures link up OK for you to see. If not I'll blame Andrew
Martin Rabeno
10/14/2006 3:32:25 PM

![]()
![]()
![]()
|
AARRGGGggggg the pictures didn't post...........
Martin Rabeno
10/14/2006 3:33:46 PM
![]()
![]()
![]()
|
AHha...now I've got it..........
Martin Rabeno
10/14/2006 3:34:41 PM
![]()
![]()
![]()
|
Hi Marty
I take full responsibility for the first photo not coming through :-)
That is just beautiful and the level of detail is truly stunning.
We've been truly spoiled by some photos of really talented work in the last few days.
Best wishes
Andrew
Andrew Biggs
10/14/2006 7:29:29 PM

![]()
![]()
![]()
|
marty .. just fantastic work the game scenes look like thay are ready to jump off of the gun , there have been alot of great show guns in the past years but this one is the best so far .. how did you remove the case coloring around the game scenes .. thanks for showing .. ron p.
SEE ALL OF YOU IN RENO
Ron Nott
10/14/2006 9:21:39 PM
![]()
![]()
![]()
|
Removing the case colors was done through the magic of Lysol Toilet Bowl Cleaner.......it also works well for removing blue prior to engraving and removing the blue in a game scene for a french grey effect..I like it better than Navel jelly as it seems to not be quite as aggresive. Rinse well with warm water and neutralize with baking soda just as you would do with any of the other solutions.
Martin Rabeno
10/15/2006 12:05:43 AM
![]()
![]()
![]()
|
Great job, Marty.
Outstnding game scenes.
Wonderful engraving and photos.
Thank you for posting them.
Looks like both you and the bear won this one!
See ya in Reno!
John.
John Barraclough
10/15/2006 10:34:36 AM
![]()
![]()
![]()
|
Hello Marty Rabeno,
I believe your work is outstanding. Excellent execution, I loved the bulino scene. I would like to ask a question about your bulino tools...I believe I read a few discussions ago that you sharpen your bulino tools to 70 degrees; I was curious, is the point of your tool multi-faceted (is it 3-sided, 4-sided, or 6-sided) or do you sharpen to a cone?
Thank you for your time.
M A Smith
Mark Smith
10/15/2006 12:13:46 PM
![]()
![]()
![]()
|
marty .. is there any chance we could see the engraving you did on the top of this receiver and any other parts that go with this gun .. ron .p
Ron Nott
10/15/2006 12:33:09 PM
![]()
![]()
![]()
|
Mark
My bulino or banknote tools are usually a 70 degree "V" in cross section shape. I use a 15 degree heel which goes up both sides of the "V". This is what I use for my lines. The scenes are a combination of lines and dots. For the dots i am using once again a 70 degree tool but this time without any heel at all so I can go straight in.
These are the only two pictures I have of the gun Ron. I am hoping that I can get some good detail shots from the ACGG photograher. The two I posted were actually a quickie done outside on a overcast day so I at least had a record of it before shipping it back to Canada. I did make a mold of both sides and am making castings of it for Reno.
What's neat about removing the case colors is that you can't remove them all and it sort of leaves a pale ghosting tone behind.
Martin Rabeno
10/15/2006 1:42:41 PM
![]()
![]()
![]()
|
To Mark Smith
You mentioned multi faceted tools, 3,4 & 6 sides and cone.
Is it possible for you to post a drawing of these please. The reason I ask is that I've never heard (or seen)of that many facets on the point of a bulino tool (mind you muy overall knowledge is pretty slim!!). Also does each one have a different effect etc. If you could post some drawings and descriptions/use that would be really appreciated.
Best wishes
Andrew
Andrew Biggs
10/15/2006 8:30:51 PM
![]()
![]()
![]()
|
Andrew..unless I am mistaken,,,,,the multi faceted tips Mark is talking about sounds like background stippling tools. I use a four sided point to stipple my backgrounds..For the banknote i use a tool which is nothing more then a typical engraving tool. Perhaps Mark thought the dots where done as a matting background tool would do.....So what do you say Mark?
Martin Rabeno
10/15/2006 9:25:46 PM
![]()
![]()
![]()
|
I might also add that for these so called dots....I am not coming straight down on the metal as in background matting.I come in on an angle similar to the angle you would engrave at..only I am poking rather than letting the graver cut through the metal. Each poke is carefully placed for effect..some light .some deeper.
Martin Rabeno
10/15/2006 9:29:00 PM
![]()
![]()
![]()
|
To Andrew Biggs and Martin Rabeno,
Sorry my friends, I was taking a nap. As to your question, I have roughly about a dozen different type of bulino tools or picks. I have discovered over the years from other engravers the use of multiple techniques and styles of bulino tools. I use square gravers, sharpened to a steep angle with no heel. I use round 3/32 shank tapered to a 30 thoundsandths shank carbide bits with multi-faceted cuts (3, 4 & 6 sided) for which I pick directly above the work piece straight in and straight out. With the the 30 thousandths bit I can write my name so small you cannot detect it with the naked eye you need magnification to see it. The handles I use for my bulino tools are 8 oz, 6 oz, 4 oz and 2 oz; the higher the ounses the deeper the tonal resolution becomes (meaning darker), the 2 oz hand piece (my lightest) is for the lighter shades. I use jewlers loops; 10,20,30 power and even higher magnification. I learned a long time ago I could take apart binnoculars and use the lenses out of those as my loops. They are a bit larger and more powerful.
And my line gravers are simply square gravers sharpened to whatever angle I need to cut the very small and uniform lines to achieve the look I am going for.
Andrew if you need I can give you all the dimensions and specs; I would have to get them off my fixtures. Martin is right about one thing, my stipling tools are almost the same as my bulino tools but they are high speed steel not carbide. I discovered that the carbide is too brittle for stipling with my power assisted hand held piece and the tips break. Many years ago my first experience with bulino technique--I was watching a gentleman executing this technique with a nail, a 4-sided nail. I'll never forget it, it impressed me from that day forward. Andrew if I can help you in any way please let me know, because I certainly have questions for you.
Thank you,
M A Smith
Mark Smith
10/15/2006 10:49:31 PM
![]()
![]()
![]()
|
P.S. I forgot because I'm not in the shop....Sometimes a customer rquests that the shading be more of a universial visual effect, and I will show them a bulino scene where ink has been added, which sometimes the customer prefers. Otherwise the effect is different from various angles. Andrew I'll start collecting all the information on my bulino tools, and give them to you.
Thanks for your questions.
M A Smith
Mark Smith
10/15/2006 11:00:16 PM
![]()
![]()
![]()
|
Hi Mark
That would be great, thanks for that. I'm sure a few others would be interested as well. Even your handles sound really interesting.
I love the idea of using the binocular lenses as loups. It never ceases to amaze me how innovative people can be. I can see you and John Barraclough getting along like a house on fire at Reno.
Anything I can help you out with just let me know. It would be my pleasure to answer any questions I can.
Best wishes
Andrew
Andrew Biggs
10/16/2006 6:11:02 AM
![]()
![]()
![]()
|
Mark
Am I correct in asuming that you are using a facetted point for your bulino work? It is also sounding like you might be using a power assisted handpiece to also do this as you are going straight into the metal from the top? Maybe I just need some stronger coffee this early in the morning.
Here are two pictures of the castings of this rifle.The details do show up better on a casting at times especially on web type photos. Ron...you can see a little bit of the top with these too.
Martin Rabeno
10/16/2006 10:09:23 AM

![]()
![]()
![]()
|
I got the photos down to a science now Andrew
Martin Rabeno
10/16/2006 10:10:24 AM
![]()
![]()
![]()
|
Andrew, I'll start that information collecting today.
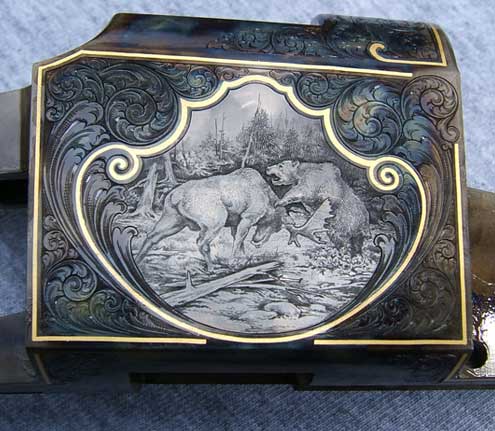
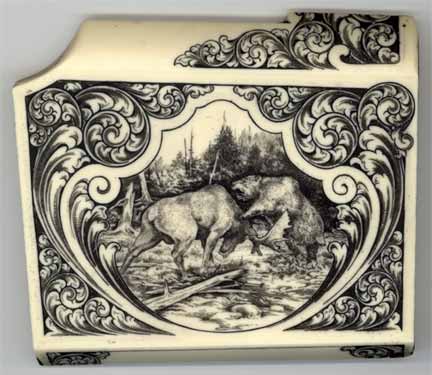
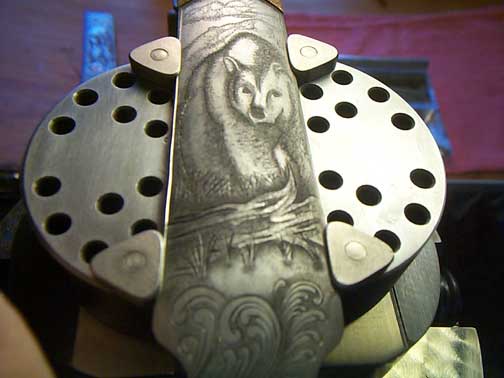
And Martin, Thank you for posting the photos of your cast--it is a wonderful example of your work. All the bulino work I do is completely done by hand. The power assisted hand piece would be far too harsh to excute those incisions precisely. Even most of my stipling work is done by hand; on the occasional project where a deeper leaf is needed I will sometimes use the power assisted hand piece. As you know most bulino scenes are always done on flat surfaces; and for this reason I go directly above, in and out by hand. The purpose for the weighted handles is to give me a greater range of atonal resolution from dark to light. The 8 oz handle gives a slightly deeper and slightly wider dot than the next handle down (the 6 oz handle)and so on. Therefore increasing my range of detail in aligning the dots. The effect from going directly above as indicated in the photos, is the effect of depth and deep shading from light absorbtion to complete reversal of light reflection. Going from dark to light as is seen in the two photos of the floorplate that was posted on the forum a couple of discussions ago; which is a great visual effect, and most of my customers prefer that. The idea behind the multi-faceted tool(8-sided) that I use on a curved surface such as a fence or recoil shield when doing some dot shading helps contain the light to a tighter formation. For the 6-sided faceted hand piece I use for what I call hidden details. If you notice in the photos, in the top photo you can clearly see a marked subtle shadow behind the mountain goats ear, that shot was taken under a flourescent articulating work lamp (of which I have two), and the other light is a traditional halogen bulb. If you notice in the 2nd photo (Bottom) that the subtle shadow is almost completely disapeared; a light source change (meaning from flourescent to halogen or even natural light); with my 6-sided tool I can hide details that can be seen at different light changes or angle changes of the work itself. My customers really like
Thank you very much for your questions.
M A Smith
Mark Smith
10/16/2006 11:58:49 AM
![]()
![]()
![]()
|
hi marty .. the castings look great ,when i get to reno i will have to get me a pair of these, just in case they go fast save me a pair .
and thanks for posting these great photos .. ron p.
Ron Nott
10/16/2006 12:34:46 PM
![]()
![]()
![]()
|
Mark
Thanks for your kind words........but you are losing me with the tonal sounds of your handles. Are you tapping these with a light hammer? When you go straight down into the metal you are really doing more metal displacement rather then fine removal of metal. That is why I prefer to go in from the side and the direction of the side I go in from makes a difference also on the overall affect. The handle I use for this type of picking is a straight wooden handle that my graver is placed into. This way I hold it like a pencil and gently poke. As they have always said."different strokes for different folks" It would be interesting to see these.
Martin Rabeno
10/16/2006 12:43:52 PM
![]()
![]()
![]()
|
For dummies like me it would be a great help if a bunch of tools were dragged along to Reno. Then I will hope I'm intelligent enough to ask appropriate questions and understand the responses.
Lee Griffiths
10/16/2006 4:22:33 PM
![]()
![]()
![]()
|
When I see this type of work all I can do is pick up my bottom jaw from the floor and go back to the bench and try again.
For Newbies like me anything I can see is a great help. And don't worry I'll ask plenty of the un-intelligent questions for everyone. Then you can ask the intelligent questions and I'll be the one standing there wondering what you're talking about.
Kevin Monahan
10/16/2006 5:21:57 PM
![]()
![]()
![]()
|
To my friend Marty Rabeno,
Sorry for the confusion in my written descriptions. I will start taking photos tomorrow to give you a photo description of the process. And it is material removal and not simply displacement. Again, sorry for any confusion. I will give you a visual clarification tomorrow.
Thank you,
M A Smith
Mark Smith
10/16/2006 11:15:36 PM
![]()
![]()
![]()
|
Hi Mark
I would love to see the tools. Like I said, I can understand the multi-faceted point but when you were talking about handle weights and sound tones.....that is what I think is confusing everone. At least that what confused me. As for Lee G..he's always confused so don't worry.
I look forward to seeing everyone in Reno
Martin Rabeno
10/17/2006 9:07:20 AM
![]()
![]()
![]()
|
I came to this site to view the fabulous bulino scene completed by M. Rabeno. I cant say enough how fine of work that is to look at. It is beyond words Mr. Rabeno. As a beginner it shows how much work ahead there is. I am writing to try and get a hold of one of your respondants, M A Smith. He mentioned that many years ago He learned to take a pair of binnoculars aprt to make a loupe. I was wondering if you could actually post this to him, and ask him if He would be kind enough to let us know the procedure of taking a pair of binnoculars apart to make a Loupe. As a Beginner I would like to learn how to do that, and practice my drawing so that someday I might be able to engrave a scene like you. I thank you.
Dietz
William Dietz
10/18/2006 2:24:36 AM
![]()
![]()
![]()
|
Thank you for the very kind words William. It does take time to engrave a bulino scene but it is fun. I engrave the same way that I draw meaning i build the engraving pretty much in the same order that i complete a drawing with a pencil. Nothing is totally finished ahead of the rest of the drawing. The whole thing builds up together. Yes.by all means practice your drawing skills. No matter what style tool or technique you use.drawing is your basic language.
I also thought tearing apart an old pair of binocs to get the lens was a great idea...funny how some things that stare you in the face go ignored.
Martin Rabeno
10/18/2006 9:18:05 AM
![]()
![]()
![]()
|
To William Dietz,
I'm assuming the procedures may be different for different binnoculars. All I did was look for small screws to disasemble (and sometimes they are hidden under the rubber guards or other locations)and I've only taken apart two but the tips of the binnoculars where the lenses are located--I unscrewed them counter clock wise to disasemble them. Basically, unscrew and look for screws and hidden screws. Also, in each pair of binnoculars there are multiple lenses (I retrieved 8 lenses out of my last one, all different magnification). Then with the lathe in my shop I turned down a small tube to house the lense when holding them. If I can be of any more assistance please let me know.
M A Smith
Mark Smith
10/18/2006 1:03:24 PM
![]()
![]()
![]()
|
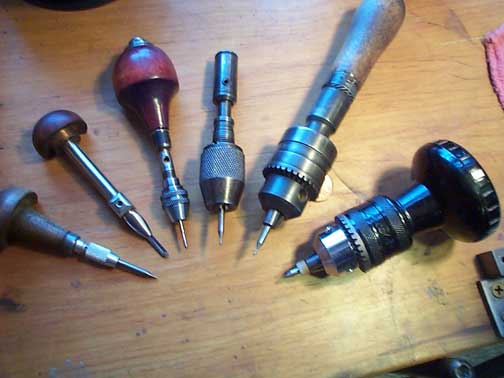
Hello Marty my friend,
I spent the better part of yesterday taking photos and trying to get more of a pictorial description of the process for how I execute bulino scenes. I'm sending a photo of my bulino tools. These tool are arranged according to their weight. The big black one on the far right is my heaviest at 8.5 oz.; The next size is 6 oz, 4 oz, 2 oz, 1 oz; and the 2nd to the last on the left ( a Ray LeTourneo hand piece) is for executing line incisions and the last on the left side is under an ounce. The two in the middle (one that is all metal and theone that has a reddish handle) if you notice in the backs of the two tools you will see those are weights, and those weights can be removed and weight can be added for finer adjustments.
The reason I use these weighted handles for execution is because each one is designed to give a specific size of dot. The heavier one a larger dot, the lighter ones smaller dots. As you know the process for bulino execution is very simple; its similar to pixels on your tv screen or pixels on your monitor. To me I think of it as a black and white photo. An accumulation of dots. The tighter the formation of the dots (or closer together) the darker they appear to be. The farther apart they are (or spread apart) gives the appearance of lighter shades of gray. When I first started executing bulino scenes I used only one tool with the dots all being one size and focusing on the image and attempting to align the dots to give a focused
image. Realizing I wanted a greater amount of detail I decided if I used different multiple sized dots, that had a far greater range of detail. My heaviest hand piece gives me roughly a dot size of a thousandth of an inch (roughly the thickness of a hair); the 6 oz is like 7 ten thousandths of an inch; the 4 oz is like 4 ten thousandths of an inch, roughly. You get the point. With my 4 oz hand piece I can write my name so small that you can't see it with the naked eye.
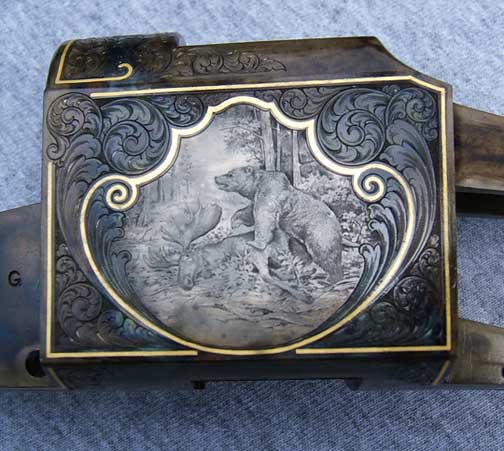
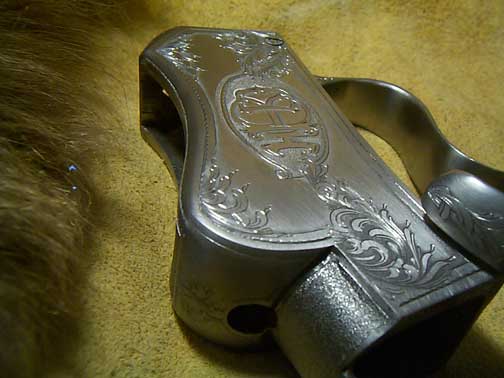
I'm sending a photo of a floorplate with the image of a bear standing over a log. This bear was done using a combination of lines and dots. The dots were to give shade and shape; the lines were to indicate the hair on his coat. The photo gives it no justice. I attempted to use the combination of the dots and lines to give the illusion of matting in his fur and to give a greater detail of his coat.
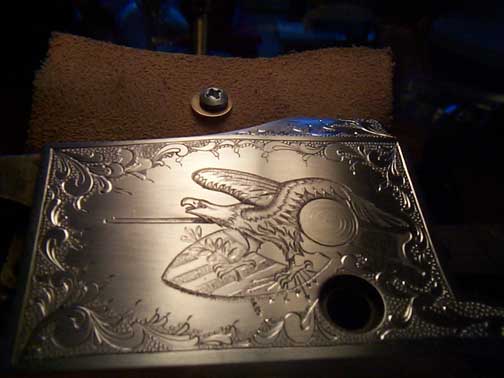
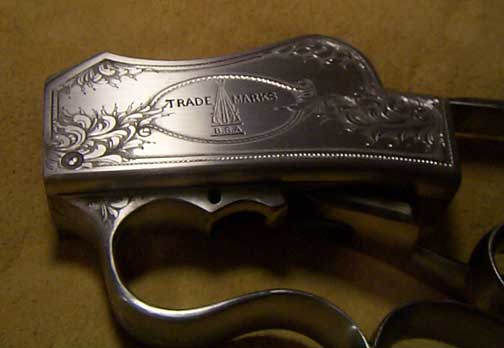
Here's an example, a photo of a Reuger #1 with the image of an eagle standing
atop of a shield with flag decoration that I did for a customer.
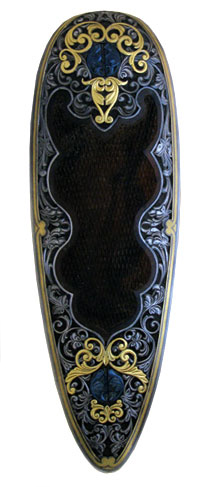
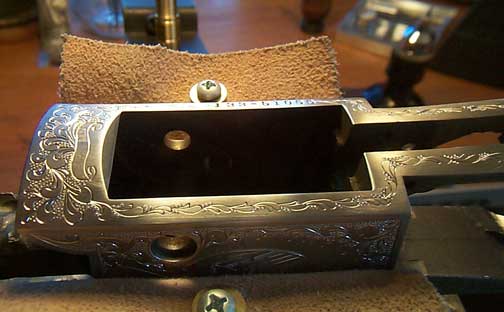
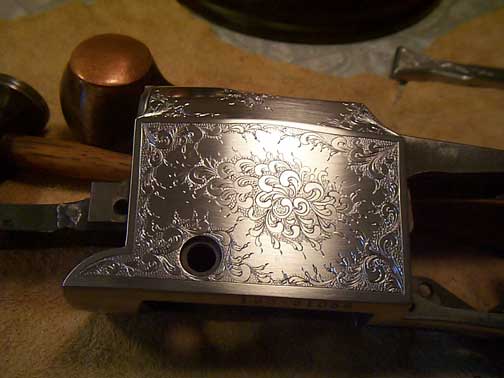
I'm also sending photos of a Peabody Martini where I executed bulino dots for shading. The effect is quite dramatic; held at one angle the scrolls are shaded nicely, slightly tilted to another angle and the dots turn from shading to reflective. It reflects the light back at you completely reversing the shading process. As seen in the photos one end is shaded and the other end is reflective.
If you have any other questions or comments, please let me know.
To Andrew, I'm still collecting that information on my faceted tool bits, please give me a couple of days to gather that up. And I threw in a couple more photos of that Reuger I was working on for you.
M A Smith
Mark Smith
10/18/2006 8:52:03 PM
![]()
![]()
![]()
|
.
Mark Smith
10/18/2006 8:52:41 PM
![]()
![]()
![]()
|
.
Mark Smith
10/18/2006 8:53:12 PM
![]()
![]()
![]()
|
.
Mark Smith
10/18/2006 8:54:12 PM
![]()
![]()
![]()
|
Mark Smith
10/20/2006 1:21:57 PM
![]()
![]()
![]()
|
Mark Smith
10/20/2006 1:22:25 PM
![]()
![]()
![]()
|
Mark Smith
10/20/2006 1:22:44 PM
![]()
![]()
![]()
|
Mark Smith
10/20/2006 1:23:03 PM
![]()
![]()
![]()
|
Hi Mark
That is quite a vast array of handles that you have created. I can understand your various shaped tool tips for your stippling. I think I would find some of these handles uncomfortable for my style engraving and my hand. But this is what makes engraving interesting seeing what every one else is doing and the varied results they get. From what can gather from your descriptions and pictures, you are using the different wieghted handles to control the depth of your dots? Are you dropping the tips onto the metal?
What I have found over the years engraving and also as an art teacher, we have a tendency to over do things and eventually outsmart ourselves unneccesarily. In most cases the simplest solution to a design or technical problem is often the best. What you engrave is just as important as what you omit. We are dealing with nothing more than an optical illusion. Your design preparation and layout is just as important as your execution. Choosing the best reference images is often overlooked by many people. Make certain you don't forget the basics of art and engraving for the sake of extreme tools. Engraving isn't rocket science. Simplify things.
Martin Rabeno
10/20/2006 1:58:36 PM
![]()
![]()
![]()
|
To Marty Rabeno,
I really appreciate your advise and your comments. But as a teacher one must be reminded that their are different strokes for different folks; more than one way to skin a cat, I guess. As a researcher by nature, I have documented the benefits and individual applications of all my tools, but I agree with you on the topic of simplicity. I believe wholeheartedly as an engineer for many years in the term we used of superior simplicity. One could argue that we as Americans are too gadget oriented. Take the Italians for example, they do so much with so little; and we as Americans have our air powered pnuematic hammers, power hones, and very complicated cutting geometry on our tool bits. One can argue many subjects for many hours on the art of engraving, thats what makes our particular trade so wonderful. Each of us have our own techniques and styles. And I want to learn them all. I truly appreciate all that you would have to offer as a teacher. Thank you again for your comments. And I really look forward to meeting with you in the future.
Thanks,
M A Smith
Mark Smith
10/20/2006 5:01:29 PM
![]()
![]()
![]()
|
Hey Mark
Differences is what makes this all fun......I do like the phrase....SUPERIOR SIMPLICITY. Or would that be an oxymoron "act natural"? who cares it sounds kewl
Marty
Martin Rabeno
10/20/2006 5:39:37 PM
![]()
![]()
![]()
|
Hi Mark
I love those tools. Drill chucks, binocular lenses. Just great. Thanks for posting the pictures and descriptions. Really appreciate the time you took to do that.
I agree with both you and Marty. The variation in style, technique, design and tools is what keeps everything really interesting. If we all did it the same it would just be boring after a while and nothing would be unique. It's these points of difference that advances the overall art and makes it contiually evolve.
I'm a keen fly fisherman and if you want to spend endless hours debating anything, just bring up the subject of what fly works best(you can choose from about 50 million variations of the same thing and they all work) And then the next day you start all over again. No conclusions are ever reached but it's a hell of a lot of fun.
Cheers
Andrew
Andrew Biggs
10/20/2006 6:46:22 PM
![]()
![]()
![]()
|
| Respond |
, Custom Firearm Engravers")
, Custom Firearm Engravers")