| Tools, Shop, and Binnocular Lenes |
Mark Smith,
Thank you for your responce about the binnoculars. I dont have a lathe. Would you be able to send me a photo or so of what you mean. My email address is: hrdd@comcast.net I really like your bulino tools too. If you have a photo of your shop I sure would like to see what it is like. It may be unethicial to ask for pictures of a shop, so if it is, I ask you to accept my apology. But either way, I am curious of how you use the loupe and what they look like.
Your Ruger is Superb! I hope to be engraving like that some day. I am sure it took many years of hard practice.
Like I told Marty Rabeno, I need to spend plenty of time drawing.
Thanks a lot Mark, you give guys like me inspiration. If you can send any photos to my email I will be grateful.
William
William Dietz
10/20/2006 5:53:30 PM

![]()
![]()
![]()
|
Yip, I agree with William. I'd like to see the pictures of the loupes as well.
In my fences post I made a comment about "strapping binoculars to my head :-)" Well blow me down, I was having a look at a dental site on the internet and there were some dental lenses you can attach to your glasses and guess what they were. Yip, minature binoculars. I just burst out laughing.
Cheers
Andrew
Andrew Biggs
10/20/2006 6:55:38 PM
![]()
![]()
![]()
|
To William and Andrew,
I went and took some photos of the loupes that I use and the shop for you William. Lord knows I need the practice taking photos. I also have a couple of shotguns I want to take photos of and capture all the details precisely. I know of no unethical process for assisting another engraver, other than maybe copying another design identically. I will get the pictures posted on the forum so both of you can see them and I will save your email address William for future corespondance. I have one request--how did you become interested and started in firearm engraving?
Your Friend, M A Smith
PS Thank you for your very kind comments.
Mark Smith
10/20/2006 9:24:49 PM
![]()
![]()
![]()
|
To William and Andrew,
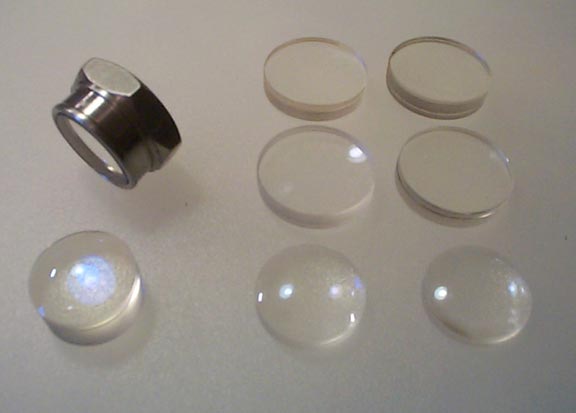
The lenses in this photo were taken out of a pair of binnoculars that I took apart some time ago.
On my small metal cutting lathe I turned down a piece of steel to encase one ofthe lenses (it helps me to hold the lense)--I guess you can use anything to encase them if you like, such as a piece of plastic pipe, copper tubing, a piece of rubber tubing, anything to help you get a grip.
Each pair of lenses that I pulled from the binnoculars are different magnification. They can be combined to increase magnification, I even on occasion will mount one to my optivser for encreased magnification. Sometimes I just hold the lenses as is. Also, one end of the lense will be flat and the other end will have a curvature. To use these
little mini-magnifiers you will have to use flat side down.
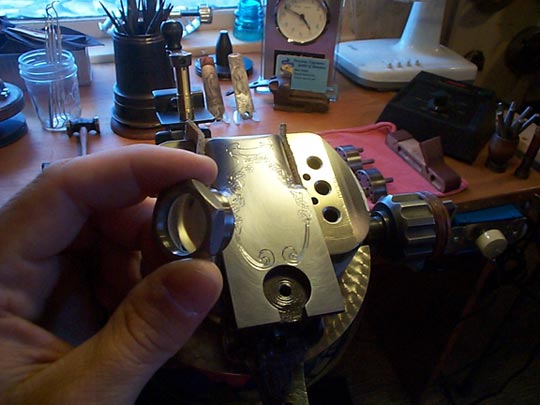
As seen in the photo, I hold my loupe in my left hand and my hand piece in my right hand. The working distance of this particular loupe is about 2 1/2 inches working distance. You can combine lenses to increase or decrease working distance but it will affect magnification. This is how I execute the bulino scenes, small scrolls, etc.
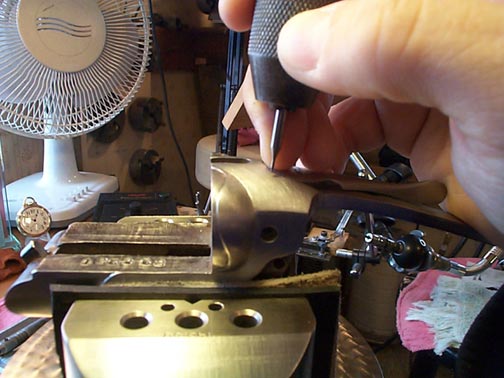
Third photo is one where I am holding my bulino tool directly above a work
piece. With my hand piece in my right hand and my loupe in my left hand, I lightly touch the work piece. If you look just under the top tang of this receiver you will see my recipicating hand piece (by Foredom). I use it 50% of the time.
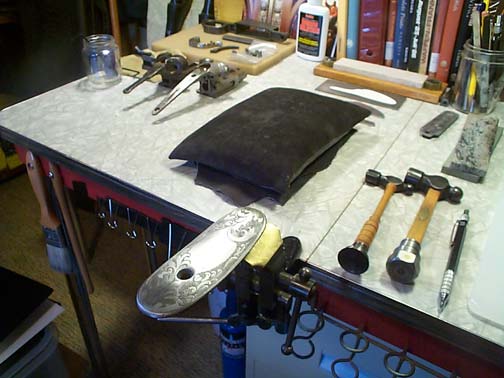
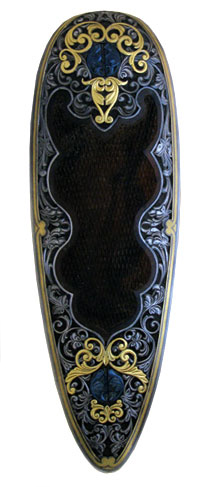
This is to you Andrew; this is a piece I am working on, a very old American shotgun--I just started to shape my fences and then I'll be on
to step two--if you like I can share the progress as I proceed forward.
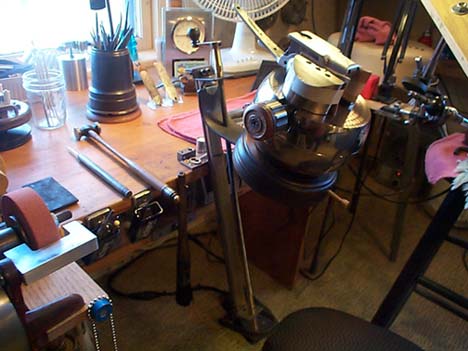
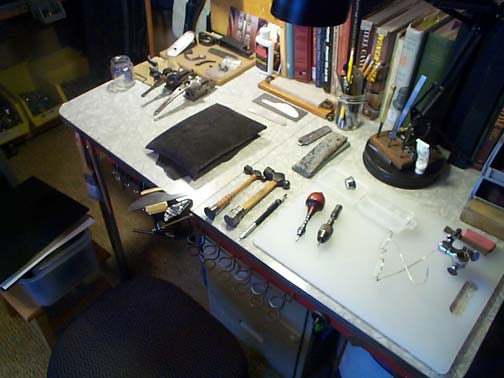
To William, this is my first workbench where I have a standard engraving ball thats mounted onto a steel framed elevator with a 3/8 rod that I use to lower and raise the ball. If you look just behind the ball
you will see a small handle. I turn it one way to lower the ball and turn it another way to raise the ball; as seen in the photo its at its highest point. If you look just to the left of the elevator you will see a chasing hammer and a chisel which I use 50% of the time. Attached at the bottom of the hammer's handle you'll see a small turned weight; for which I have several small weights for balancing my handle, they closely match the weight of the head of the hammer. All my hammers have weighted handles for better balance (this is for Marty); the idea behind this process is much like a balance wheel on a pocket watch which I work on as a hobby. As long as the balance wheel is balanced well it will rotate back and forth very smoothly and quickly. As I hold the hammer in my hand it will rotate in the same fashion.
This is workbench #2 where I do my shaping and filing, and some bulino work.
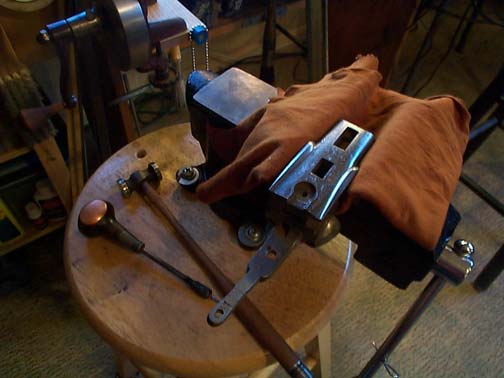
This is my workstation #3. This is where I do all my chasing and hammer work. Its a small stool where I have mounted casters to each of the legs; I simply spin the stool with my feet while I'm working, or my office chair has casters so that I can rotate around my work piece.
In the last photo is a 1951 Atlas screw cutting lathe and just to the right is a Chinese made mini mill. These tools are essential to me, for I still make tools to this day. They are excellent for making fixtures, holding fixtures, modifying handles, anything I need.
To Andrew, When my wife and I read the part of your posting where you would take a leaf out of Mark's book about strapping a pair of binnoculars to your head my wife and I laughed all night long. A couple of years ago I tried the binnocular microscope and it wasn't good for me. I even tried the medical binnocular loupes but I couldn't get used to the 14 inch working distance. You are a funny freind and I can't wait to meet you.
If you guys have any questions or comments, I am here to help.
Thank you,
M A Smith
Mark Smith
10/21/2006 2:09:50 AM
![]()
![]()
![]()
|
Mark Smith
10/21/2006 2:10:13 AM
![]()
![]()
![]()
|
Mark Smith
10/21/2006 2:10:29 AM
![]()
![]()
![]()
|
Mark Smith
10/21/2006 2:10:45 AM
![]()
![]()
![]()
|
Mark Smith
10/21/2006 2:11:05 AM
![]()
![]()
![]()
|
Mark Smith
10/21/2006 2:11:26 AM
![]()
![]()
![]()
|
Mark Smith
10/21/2006 2:11:43 AM
![]()
![]()
![]()
|
Mark Smith
10/21/2006 2:11:58 AM
![]()
![]()
![]()
|
Mark Smith
10/21/2006 2:12:17 AM

![]()
![]()
![]()
|
Mark
I've been looking at mini mills like the one in your photo.
are they worth the money or would you suggest a more expensive one.
I would just be using it to play with knives and Harley parts.
Thanks
David
K. David Gruber
10/21/2006 6:57:30 PM
![]()
![]()
![]()
|
Hi Mark,
I just got thru looking at you fantastic photos for the tenth time. I am truly impressed. I will be looking at them for quite sometime I want you to know, and tomorrow I am going to thew Office Max to buy photo print paper and print them out. I dont know where to start actually, I have question, after question about all of them
One of the first things that I see that is neat and such a good idea is the huge heavy vise on the stool. The idea is out of this world. How you could think of a stool as a work holding devise is beyond me. I am adduming then you do all your work sitting? Where as in one of the photos on the forum I see the English fellow, or German, Phillip Griffney I'm not sure of his name, standing while working. When you spin the stool with you feet, do you have good control as if you were turning it to cut a scroll? Or do you cut for awhile, and then stop and turn it? One of the engravers out west I heard uses a potters wheel to turn his work, and your stool I guess is used in the same manor. I'd like to tell you before I get on any further, your shop looks really good. Could you tell me, is it connected to your home, or is it a garage. Where do you have it as opposed to where you live? That is one question. Your lathe is a great looking piece of equiptment. It must be your right arm being a tool maker, as well as a maker of probably any other kind of aparatus you might need......such as, counter balances for chasing hammers! Again, I assume that after hours of working with the hammer the counter balance weights make each blow much easier and smoother? Is that the idea? I know that after a long time using my hammer, my wrist feel like I have Carporal Tunnel syndrome. Its bad I tell you. I really like all the fine holding jigs you have for everything. It makes your shop so presentable and neat. One thing I cant see well enough to understand, except for the top, is your block. I do see the handle but I cant quite picture in my head what you mean about how you lift it up and down. Why Does it rest down into something? Does it stay stationary? It looks pretty. That engine turning is Fabulous Looking. Better than I have see on a lot of guns! Being a tool maker, definately sets you apart Mark. You are many steps ahead. One of the things about being a tool maker like you are, are that even if you know how to operate a lathe or mill, you have to know how to design first. You see it in your head before you even tool up. Not everyone can do that. A lot of people dont realize that, and they buy equiptment and when they have it, it just sits there. You, I can clearly see, are a designer king! One thing I would like to learn more of is your Block? It looks so impressive, and I am still trying to figure out how it works? How did you make it, and what did you start with? That Block sitting there looks like it should be in a show journal of Machinest Magazine! Wow? Could you tell me a little about how you thought it up and what you used. I spoke to Ray Viramontez (probably spelled wrong) and He told me about His Vise once and How it would hold a Harley Davidson Front end. I asked why, and He told me that years ago Harleys guys all wanted their bikes engraved and He had to make something that would hold the work. After seeing your vise, I sit and look at my tiny little GRS contraption, and wonder how I would ever hold a large piece. If you could tell me some about it I would like that too Mark. Heck, you'll never get any work done. Listen Mark, I do not know what my space limit is here, so I am going to have to answer all your great photos with questions in several parts if that is ok with you. I will start my next responce tomorrow after I get back from Office Max. I want to thank you. You have really bent over backwards in your helping of questions, and then with all your great photos of your shop. Really, Thanks a Million. It is inspiration plus! You cant buy that in a book guys. I truly appreciate it a lot.
Thanks,
William
William Dietz
10/22/2006 5:05:23 AM
![]()
![]()
![]()
|
Hello Marty,
Your bulino tools up close like that are much easier to see. Whenever I get to the point where I am doing Buliono work, I would like to ask you for your help in putting a face and heel on them. By listening to your procedure and what you do, I cannpot picture it mentally enouch to do it. Ray LeTourneau makes nice handles and tools. I want to order some of his work soon. I would also like one of his vises. I wondered, maybe you could help. I first learned to use a hammer and chisel by a local gun shop engraver here in south florida many years ago. I didnt continue as I am sure you can know, but I never forgot how to use the hammer and chisel, and I really liked it. I have a gravermax, and Steve Smiths Air chasing tool, but I like the Hammer and chisel better. Would you say I should concentrate my practice more with the hammer, or the power assisted tools? I ask because there is only so much time to use, so your practice should be really focused. What is the best in your opinion? I want to say to you as I did Mark, thank you guys a million for your help and the opportunity of getting professional Help. It has been privledge chatting with you guys.
Thanks,
William
William Dietz
10/22/2006 3:20:53 PM
![]()
![]()
![]()
|
Hi Mark,
I have been looking at your photos over and over. Your vise has me really intrigued. What a piece of work. Here are some things other than what I already asked about your vise. There is a red wheel in the 4th photos on the left side. What is that? It looks like a sharpening wheel of some kind. It has a nice work rest on it. Also, do you use a power assisted hand tool at all? It looks like you are completely Hammer and chisel. I am really curious about that too. To the right of your big bench vise, I see another tool up to the bench, could you tell me what that is? I see a crocker sharpener on your designing table, is that your main source for sharpening? I was wondering about that too. On your designing table in the photos at the bottom of the page there is a fixture holding a piece engeaved. Do you engrave there? Is that another vise. I am thinking about trying the stool vise set up you have if you dont mind. I have a Old antique wilton vise, and a solid antique stool from the turn of the century so I am thinking about trying to make a rolling vise set up. I am going to sit down and practice with my feet and see if it is a good idea for me. Maybe my hand foot cordination isnt like yours. I dont know, that is a while off. In the second photo, behind the jar of pencils and scribes, there is a tool with a knob handle, is that something that pertains to the shop? Like a jig of some kind? In the second photo of you doing work, is that bulino work? I would say that is enough prying into your work. I hope I am not being rude. I feel like this is a Opportunity for a beginner like myself to learn from a professional, and I am hungry to learn. You have set a first class example of a shop and work. thank you again Mark. I look forward to hearing from you.
Regards,
William
kz
10/22/2006 4:04:12 PM

![]()
![]()
![]()
|
David Gruber,
One of the considerations when I first purcharsed this mini-mill was its weight. It only weighs 150 lbs and if I move then I can eaisly move it by myself so that was one of the considerations. I have a freind who is a popular knife maker, and he has a full size mill and he spoke of having to move it with a fork lift and if he ever had to move it again it wouldn't be an easy task. Mostly what I use my mini-mill for is small parts, slotting and milling. Thats mostly what I did with the larger mills was small parts. It just depends on how you intend to use it. I've made modifications on mine to fit my needs and this mill has been very good to me.
M A Smith
Mark Smith
10/22/2006 4:09:37 PM
![]()
![]()
![]()
|
To William,
I'll try to answer all your questions so far; if I miss one, please let me know.
I find your entusiasm interesting and refreshing. Your question about the shop--it is a small room adjacent to the house roughly 15X15 with vinyl flooring for easy clean up. The stool (of which there is actually two), their first element is space saving as I can roll them from one work station to another. And I can turn them with my feet and sometimes spin around them with my chair as posted before. And I can cut scrolls with them. And I can attach different vises or other attachements to them for muliple uses.
You asked a question about a red colored circular object--it is a hand grinder for sharpening--sometimes I use it to put a quick sharpeing on when trying to finish up a project. It has other fixtures that can be attached to it that aide in my sharpening as well.
You were correct in the idea of the weighted hammer handles. Another point, with both ends being matched in weight it is much easier to balance and its a consistent rotation.
Your question about the engraving block. First of all I apologize if any of my descriptions are difficult to understand. In the photo looking at the handle; attached to the bottom of the handle there is a 3/8 threaded rod that runs the length of the frame. If you notice, there is a bracket attached to the frame and the rod running along underneath the engraving block. That bracket attached to the engraving block is threaded and there is a threaded nut attached to the underside of the bracket. Its like having a nut and a bolt; you turn the nut one way and it rotates in one direction, turn it the other way and it rotates in the opposite direction. When I turn the handle it turns the bolt lifting that bracket that supports the engraving block lifting it up or down. The brown cradle is a wooden felt lined base for the block. so I can roate it in any direction. I can even rotate it completely sideways for unusual pieces. All the moving connected parts are made by brass and bearing to ensure a long life. The block itself is a standard six inch Euproean model that I aquired sometime ago; I see similar ones on the interet for sale (although mine has been modified abit. I have fixtures that can be attached to it to hold large pieces. I've installed pieces to the main bearing to give me a rotational drag resistances for the heavier pieces, meaning that I can adjust its drag on how fast it rotates. And the entire ball & bracket is very rigid).
As previously posted, I do use about 50% of the time a modified hand recipicating power hand piece by Foredom. I find it very useful. I once tried a GraverMax, but it had a slight hissing sound from the unit that bothered my hearing.
Regarding the tool to the right of the big bench vise you mentioned--it is the hand grinder already mentioned previously in this posting--its just from a different angle.
You have real eagle eyes noticing that cocker there--I do sharpen with a crocker but that is not my primary source of sharpening. I have a small work station with two grinders and one sander set up. The two grinders have different grit wheels. I made all new tool rest and special spring loaded sharpening fixtures that specifically hold different size gravers at different sharpening angles.
I do engrave at that station depending on whats in the vises at the other work stations as I do work on multiple projects simultaneously. It is a small European vise. I have many different vises that I can use at that station--I'm a bit of a vise collector and have many different vises of varying styles and ages. One of my oldest ones is a European brass and wood vise that is one of my favorites, and its design is clearly seen in our contemoray vises today.
The metal knob you can see in the second photo is a tool I use for balancing barrels on my vice; it is simply a turned weight attached to an old tube cutter that I removed the cutters from and replaced with turned brass wheels so that it wouldn't mar the barrel. I'll send you a photo of it to your personal email address. Man you've got good eyes, I didn't even know that was in the photo.
Regarding your last question of photo #3, that is how I would execute my bulino work.
Thank you,
M A Smith
Mark Smith
10/22/2006 5:29:58 PM
![]()
![]()
![]()
|
Hi Mark.
Great photos of your workshop and eye loupes. Thanks for that, much appreciated. It's always really interesting to see other peoples workshops. How long did it take you to clean up before you took the photos!!!!!
Someone over here in NZ published a picture book a few years ago called "blokes n sheds" (a shed over here is a small outside workshop/room /garage)which had photos of all these back yard hobby workshops ranging from fixing and building cars to model trains. A great little book. All these guys had one thing in common. They all spent more time in their sheds than in the house and all had enough tools to sink a battle ship.
Yip I'd be keen to see progress photos of the action your working on. Mine looks identical at the bottom. One thing I've discovered is that nothing is symmetrical about them. On a casual glance they look fine but when you really look closly, nothing is even and they can be quite a few millimeters out from one side to the next.
Cheers
Andrew
Andrew Biggs
10/24/2006 5:44:31 PM
![]()
![]()
![]()
|
Andrew,
Believe it or not, this is how my shop looks all the time, I guess it appeals to my meticulous nature. After each work day, I spend 10 to 15 minutes wiping down or cleaning up. I didn't display my photos of my graver cabinets where all my gravers are in rows, all my bulino tools are in rows, even my hammers I have in rows. I guess thats just who I am.
I would be glad to post a pictural progress of that particular piece that was in the photos.
Thanks,
Mark
Mark Smith
10/24/2006 8:37:28 PM
![]()
![]()
![]()
|
| Respond |
Back to Forum
|

|
, Custom Firearm Engravers")
, Custom Firearm Engravers")
