| Background removal |
Hi everyone
Here’s a topic for you guys……………Background removal.
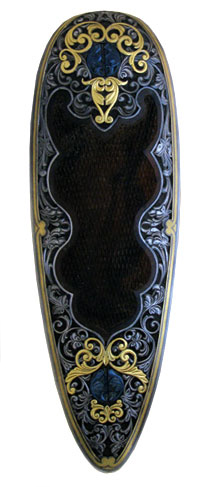
With my limited experience I’ve noticed that if there is a chance to mar an engraving it’s with background removal. If not done very carefully it can start altering the shape of things especially if you start digging into the walls of the engraving main cuts.
At the moment I’m using small flats made up of flat gravers (not modified squares V) powered by a Lindsay Air Graver. I grind away a semi circle behind the heel so that when I turn tight corners I don’t chew up the wall of the engraving.
I’ve tried using a high speed rotary air tool (similar to the GRS one) with 1/16th dental burrs but with limited success as even the smallest ones are generally too big and getting it even is quite hard. However I’ve read that a lot of people use them and are a lot quicker for background removal which is a tedious job at the best of times. (the noise also makes the teeth tingle a bit!!!!) I’ve also read that some engravers modify the dental burrs to cut the steel a bit better.
I know it’s a basic but interesting topic as the background is an integral part of the overall engraving and can really enhance or detract from the overall effect.
So what do you guys use most of the time, flats or high speed rotary or even acid??
Cheers
Andrew
Andrew Biggs
4/10/2007 6:02:24 PM

![]()
![]()
![]()
|
Andrew.
I use various size flats for my background removal. I start from the edge of the scroll with a bevel cut tapering away from the scroll. Then I just WHACK OUT the interior area. Believe it or not I do like removing the background with my hammer and chisel at times. After matting the background I go and recut around the edge of the scroll to clean up the edges and it makes the background actually look deeper than it really is.
Marty
Martin Rabeno
4/10/2007 6:14:02 PM
![]()
![]()
![]()
|
There seems to be a number methods used for background removal. I talked with Phil Griffnee about his deep sculptured work and its background removal. He uses hammer and flat chisels and says it goes quickly...must be the practice he gets. I use the same square graver I cut the scroll with. I start in corners and work in a fine fan pattern. Then stipple to blacken. For a really fine background I use a very small punch to flatten the fanned out lines before stipple work. If you run into your scroll but don't actually remove metal, you can usually burnish the damaged area back into place. S
Sam Welch
4/10/2007 9:08:15 PM
![]()
![]()
![]()
|
Andrew,
I've used several methods and sometimes it depends how much has to be removed. I like to start with a plain old square however. I'll use that tipped away from the srcoll to make the first cuts and those hard to reach areas. Then I'll go to flats or rotary. The key with the rotary is the right burrs. I use anything from 1/4 round to a 2 round. Also, I feel SHARP burrs are important! Many engravers say they get them free from a dentist and use them but I find that for around a buck each, I like the way a new one cuts. I may use several on one gun. When I think they aren't cutting well, I get a new one and will prove my point. If there is just some small areas to remove, I'll just use flats too. Sometimes its just what I feel like doing that day. Both seem to work well but b oth do take time and care. As others said, it is important to clean up any cuts after stippling. It will also enhance the look.
Rex Pedersen
4/10/2007 9:53:20 PM
![]()
![]()
![]()
|
Andrew,
I use an onglette and cross hatch my cuts to remove the background, and then I go in with a ponted punch and stipple the background. I stay away from a rotary tool. To me a rotary tool is an accident waiting to happen. Keep up the good work.
Yours truly,
JJ Roberts
School of Artistic Engraving
Manassas, VA
J.J Roberts
4/11/2007 5:15:46 AM
![]()
![]()
![]()
|
Andrew,
I have a rotary tool but it just keeps kickin my butt every time I try to use it. I agree with Rex that sharp burrs make a difference. The sharper they are the quickler I did a big hole and the faster my blood boils. For now I'll stick to the gravers for background removal.
Kevin
Kevin Monahan
4/11/2007 10:15:33 AM
![]()
![]()
![]()
|
Hi guys,
I think you will have to use about every method depending on the spaces you are working. Small areas I use Sam's method. Larger areas with more background, I use flats with a width comparable to the space. I then use matting punches to get the contrast. I also, like you guys, often go over the outlines of the scrolls again for that very crisp definition and contrast.I will use about any method that saves me time, but I am a little afraid of the rotary tool, maybe on very large areas, but It makes me a little nervoous.
John,
I already figured out what to do about the "case of the bendng brass", but thanks for the info. It will be useful to anyone not used to fixing their own problems. Thanks John.
Ron S
Ron Smith
4/11/2007 3:56:06 PM
![]()
![]()
![]()
|
You guys have no guts....
:)
Seriously, the rotary tool works well for me but I only use SHARP burrs and the right size for the job. I also make sure to kiss the surface and don't try to get into little tiny places.
Rex Pedersen
4/11/2007 4:19:03 PM
![]()
![]()
![]()
|
Well who would have thought that there would be so many ways to attack the same job!!!!
I did learn somthing as well. I've been angling my flats into the scroll trying to get the same angle as the main graver cut............it never actually occurred to me to angle them away from the scroll. I tried it last night and it was much better. The walls of the engraving didn't suffer nearly as much. I also tried the square/onglette graver in the smaller areas and that worked much better than what I've been doing with tiny flats.
Tonight I'm going to put on my hard hat and flack jacket, have a stiff gin and pull out the big guns.............the rotary tool!!!!!! So if you hear a scream you'll know what happened :-)
Cheers
Andrew
Andrew Biggs
4/11/2007 4:59:35 PM
![]()
![]()
![]()
|
Andrew,
I know you are a tough guy and can handle that rotary better than those whimps..
:)
Don't forget once you get it removed and do the stippling to go back and clean up the cuts around the scrolls. You can just make a minor "clean" cut or actually do a slight bevel to give more of a 3D effect.
Good luck!
Rex Pedersen
4/11/2007 7:36:07 PM
![]()
![]()
![]()
|
I hope I'm not misrepresenting anyone. I believe Chris DeCamillus uses a rotary tool very effectively for almost all of his background and believes it to be more controllable and faster. He uses the NSK not the high speed dental wonder. The NSK is a very high quality electric rotary sold by GRS. Much better than a dremel. He has found a source for very small burrs for the tight spots. I don't have much experience with it but he is turning out some exquisite work. Sam Alfano has told me he uses the rotarys at times. I have a dentist friend/student that can grind out an almost perfectly smooth background. Must be practice.
Lee Griffiths
4/11/2007 10:33:10 PM
![]()
![]()
![]()
|
i use flats the way most say here. i also sometimes take rounds and cut parallel lines, then a parallel set crossing the first ones at 90 degrees. this leaves a lovely bunch of stubs sticking up just waiting for a flat graver. if you usy rotary burs of carbide, i think it's important that the burr be drawn towards yourself, rather than away. this allows for much better control of the burr, especially the low speed models. the carbides,especially, because of the direction or rotation will want to run away if you let the burr move away , rather than towards yourself.
j.d. swartzfeger
6/14/2007 12:31:20 AM
![]()
![]()
![]()
|
Andrew,
I agree with Ron Smith: Depending on the particular job, you are likely to use just about every technique!
Also, like Marty & JJ, I use an onglette to outline the background area & then flats of different sizes to remove the background. Sometimes it is necessary to repeat this process to get the desired depth.
I also use a dental air drill handpiece for some background removal. I have it setup where it runs a constant speed adjustable with a regulator (that way your foot doesn't get worn out holding a fixed position). For the burrs I use the 1/16 size but grind them into a long, three-sided tapered point. I find these very useful for getting into those little tiny spots that are so hard to do otherwise. The points shaped like this cut well and they don't have the tendency to grab and fly up out of the cavity the way a standard burr does. After the background has been removed I then (& it's fairly smooth at this point) I stipple with a punch I made that roughs up the background.
Hope that helps.
Weldon
Weldon Lister
6/14/2007 11:32:24 AM
![]()
![]()
![]()
|
I'll use the rotary tool if the area is fairly large and I will leave a small area next to the scrollwork that I remove with a flat, square, onglette what ever is needed to fit the area. I never try to use the rotary tool right next to the scrollwork.
Robert Bissell
6/14/2007 6:51:19 PM
![]()
![]()
![]()
|
| Respond |
, Custom Firearm Engravers")
, Custom Firearm Engravers")